
If you have 12 minutes of free time and would like to learn more about this topic, I highly recommend watching Brodie Robertson’s YouTube video on why you should uninstall oh-my-zsh.
I started using zsh around 4 years ago when macOS was still using bash as the default shell just like most Linux distributions. The reason I made the switch from bash to zsh was that Linux YouTubers like Luke Smith and DistroTube were popularizing and advocating it. Another shell in question was fish. But after trying out both zsh and fish, I felt like the former had a greater following and community support. For that reason, I decided to use zsh as my default shell.
Like most new zsh users, the first thing I did after installing zsh was installing oh-my-zsh and followed the README to choose a cool theme for my prompt (there are more than 140 of them!). For those who have never heard of it, oh-my-zsh is a community-driven framework and plugin manager that can allow zsh users to extend their shell functionality and appearances with significant ease.
Technically, using the term “plugins” is a bit of a stretch. Every zsh “plugin”, for instance, “autojump”, or “colored-man-pages”, is just a small shell script, that can be “plugged into” your .zshrc configuration when loading up your zsh.
So, why move away?
The short answer is “bloat”. I find myself using oh-my-zsh only for prompt themes, colored man pages, fzf, and git integration. Yet there are 286 plugins in total, waiting for me to enable them. Do I really need them installed on my machine? It’s also not uncommon to think that “I might as well enable these plugins now that they’re installed anyways” and bit by bit the load time of launching a shell grows.
What are my essentials?
So last week, I sat down before my .zshrc config file and inspected it. I had made a list of the essentials I need, and if by the end of my small research, I can do without oh-my-zsh, then I’d uninstall it.
The essential list was:
- A nice prompt.
- No duplicate history when reverse-searching my commands.
- Case insensitive completion.
- Emacs-style keybindings in zsh’s command line editor (the place where you type out the commands).
- Zsh syntax highlighting.
In the process of listing my essentials, I eliminated “git integration” from my command line, since 99% of the time I deal with git stuff in Emacs using the “Magit” package anyways. I have developed a rather sophisticated workflow in Magit that allows me to stage, commit, push, pull, stash, rebase, reword, and squash, etc. Showing the git status in my shell prompt is cool, but not essential.
Uninstalling oh-my-zsh and plugging in my essentials
With a clear goal in mind, I uninstalled oh-my-zsh. The next step is to put back the five essentials listed above into my .zshrc file.
Goal 1: A nice prompt
This one is easy — I just need my prompt to be shortened and easy to notice. With the simple script PROMPT='ianpan@arch:%1~/ %# ' placed somewhere in .zshrc, I can make my shell prompt look like this:
 PROMPT=’ianpan@arch:%1~/ %# ‘
There’s just one problem left to address: the prompt can easily be buried with a load of command line output, and scrolling back to find which prompt started the command could be hard. For this reason, I added a gradient “bling” to my prompt by using the 256-color-codes of shades of blue and cyan.
I modified my simple script to PROMPT='%F{33}i%f%F{39}a%f%F{38}n%f%F{44}pan%f%F{50}@%f%F{43}ar%f%F{44}ch%f%F{38}:%1~/%f %F{44}%#%f ' and my prompt got a 10X upgrade.
 Manually added gradient color codes for my prompt
I did the same thing for my Ubuntu prompt, except this time with different text and colors.
PROMPT='%F{202}i%f%F{208}a%f%F{214}npa%f%F{220}n%F{221}@%f%F{220}ub%f%F{214}un%f%F{208}tu:%f%F{202}%1~/%f %F{214}%#%f '
 Similar process, except different text and colors for Ubuntu
Goal 2: No duplicate history when reverse-searching my commands
This one is pretty simple, too. I added the following lines in my .zshrc and it solved the problem of having duplicate command history when you press the up-arrow or Ctrl-r to search for commands. These are just built-in zsh parameters for us to tune. Anywhere you see the term hist, it means “history”.
1
2
3
4
5
6
7
8
9
10
11
HISTSIZE=5000
HISTFILE=~/.zsh_history
SAVEHIST=5000
HISTDUP=erase
setopt appendhistory
setopt sharehistory
setopt incappendhistory
setopt hist_ignore_all_dups
setopt hist_save_no_dups
setopt hist_ignore_dups
setopt hist_find_no_dups
Goal 3: Case insensitive completion
I followed this guide to achieve case insensitive completion, which is the behavior of your shell correcting your lowercase to uppercase or vice versa, when you use TAB to autocomplete a file or directory name.
TL;DR: just put these two lines somewhere in your .zshrc and you’re done:
1
2
autoload -U compinit && compinit
zstyle ':completion:*' matcher-list 'm:{a-z}={A-Za-z}'
Goal 4: Emacs-style keybindings
Having used Emacs for 3-4 years now, I know my way around the Emacs-style keybindings. Here are a couple of them that I find especially useful.
- Ctrl-a: jump to line beginning (same as pressing
Home). - Ctrl-e: jump to line end (same as pressing
End). - Alt-backspace: backspaces a whole word.
- Ctrl-k: delete from current position to end-of-line.
- Ctrl-a Ctrl-k: delete whole line (it’s a combination of “jump to line beginning” and “delete from current position to end-of-line”)
- Alt-b: jump left a whole word
- Alt-f: jump right a whole word
Many shells (e.g. bash) already use Emacs-style keybindings by default. If you still want to explicitly set it, here’s how:
1
bindkey -e
If you’re a die-hard vim fan, feel free to set bindkey -v to enjoy vim bindings in your shell’s command line editor.
To read more about command line editors, consider this Wikipedia page.
Goal 5: Zsh syntax highlighting
My final goal on my essential list is to enable syntax highlighting in the zsh command line editor. For instance, when I type an invalid command, it would be red, and when I type a correct command, such as “ls” or “cd”, it’d be green.
Here’s a screenshot to explain what I meant by zsh syntax highlighting:
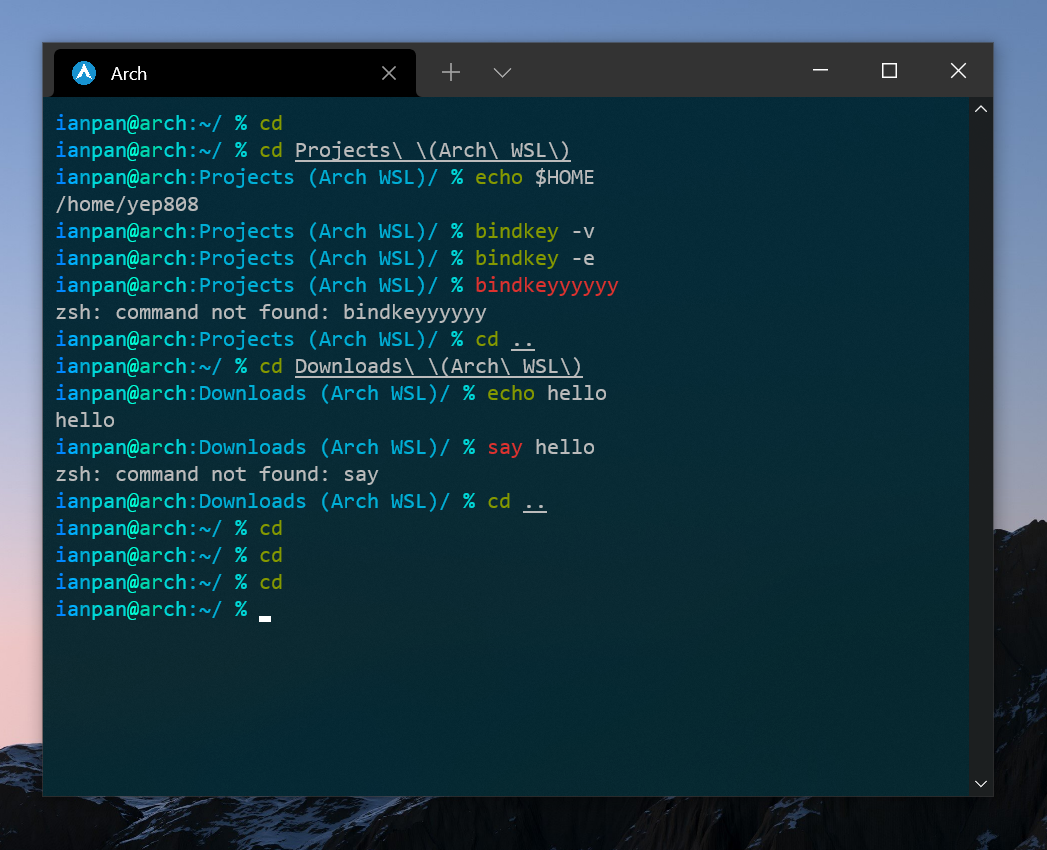 Zsh syntax highlighting
This can save you the hassle of pressing Enter and only then finding out the command you typed had a typo.
To enable this cool little feature, we need to install this package, which is conveniently named zsh-syntax-highlighting. Follow the official guide to install the package for your operating system, and add a line or two to enable the feature in your .zshrc.
Since I’m using Arch, I would first install zsh-syntax-highlighting using the pacman package manager (pacman -Syu ; pacman -S zsh-syntax-highlighting), then add the following line to the bottom of my zsh configuration file:
1
source /usr/share/zsh/plugins/zsh-syntax-highlighting/zsh-syntax-highlighting.zsh
Note that the exact directory to “source” depends on where you installed the syntax-highlighting package. “Sourcing” is nothing complicated, it’s simply taking the file you want to source and dumping it in your .zshrc.
Concluding words
If you were an oh-my-zsh user and followed everything in this article, congratulations! Your shell should feel more snappy and responsive, especially when launching a new instance. If you are a proud oh-my-zsh user who has brilliantly fast hardware or doesn’t care about the extra second of load time — that’s fine, too!
That’s all for today, cheers.